How to Build a Fence Like a Pro: A Complete Beginner’s Guide
Key Highlights
- How to build a fence in the Atlanta area, the first issue may be the red clay soil. In other words, the dirt is packed hard with roots; thus, equipment such as post hole diggers or an auger may be called for in lieu of using a shovel.
- Before starting a large-scale excavation, it is necessary first to have utility lines marked out, to prevent any risks to safety and health, as well as to avoid any losses in finances.
- When using the right high-quality materials to build the project, the materials will last longer, so when constructing a new fence in a wet climate such as Atlanta the preferred material would be pressure-treated pine. Cedar would be an additional costly alternative with an increased resistance to insects and rot.
- When two people work together they can take approximately two weekends to build the new fence of 150 feet in length.
How to Build a Fence
Building a fence within Metro Atlanta may seem like a relatively simple project. But besides digging holes and installing posts, much more work is required for a lasting result. The red clay dirt, differing climatic conditions, and a set of tough local requirements of the State of Georgia will ensure a costly mistake is created if not carried out correctly. That is how a low-cost fence, which is installed with poor work, frequently leans, warps, or fails prematurely.
I, Mr. Jay Fahat, am an expert on fencing and have good exposure in fencing installation in Atlanta and North Georgia. I have helped many residents in erecting durable and good-looking fences with a view to providing privacy and all other relevant purposes.
You don’t have to go on this trip alone!
With numerous installations of fencing throughout Metro Atlanta, Bravo Fence Company has a deep understanding of the local soil conditions, climate, and fencing codes. Thank you for your interest in building your own fence. We’ve put together this guide as a reference tool for you as you embark on your DIY fence installation.
Included in this guide are complete step-by-step instructions on how to build a fence, maintaining a stable and strong fence, and dealing with the effects of tree roots so that your fence remains protected from these hazards and continues to serve you faithfully for many years to come.
How to Build a Fence: Step-by-Step
Our Project Information and Recommendations will be based on how to build a privacy fence, which will consist mostly of Wood Stockade or Shadow Box Fences since that is what most of the homeowners in Atlanta want from us.
Step 1: Layout and String Lines
The first step that has to be followed when creating a site plan is to identify the corners of the site. A layout and string lines must be created in order to do this. This can be done by banging a stake into the ground at each corner. The corner locations can then be marked using a mason’s string (used as the line) that has been drawn taut using the three stakes. The string is stretched 6 inches above the ground.
- The Golden Rule: This is the representative line for the face of your fence posts. Not the center.
- Square corners: Apply the “3-4-5 technique” to square your corners at a perfect right angle of 90 degrees.
Part 2: Dig the post holes (Fighting Georgia Clay).
This is the most difficult aspect of how to make a fence! Before digging your holes, be sure to contact 811 so that any underground utilities can be marked; this could save you from various accidents as well as being very expensive to repair, and you can find out more about this by visiting call 811 before you dig.
How deep should fence posts be dug in? Around Atlanta, we don’t really have a frost line for deep digging; we dig for stability against wind resistance.
- Depth: Bury line posts 24 inches deep. Corner, or gate, posts should be buried 30-36 inches deep.
- Width: The hole needs to be approximately 10 to 12 inches wide (bell shaped at the end is ideal for preventing lifting).
- The Root Problem: When your auger finds a rock or a thick root (which it will), you will have to use a digging bar, which is a heavy metal rod that you use to pulverize it by hand.
Step 3: Setting the Posts
You can choose between setting posts in concrete or using gravel (for drainage), but for a heavy privacy fence, concrete is king.
- Gravel Base: Pour about 2-3 inches of gravel at the bottom of the hole for drainage. This works to avoid water accumulation at the bottom of the post.
- Placement: Position your unit into the hole against the string line (do not push on the string line).
- Spacing: You should space fence posts a certain distance apart when erecting a fence. Standard spacing is 8 feet on center. If you are using pre-made panels, measure the panel exactly first!
- Concrete: Pour dry concrete mix (e.g., Quikrete) into the hole around the post. Pour in enough water to fill the hole, and then mix the concrete with a stick in the hole (or mix in a wheelbarrow before pouring into your hole for a stronger bond).
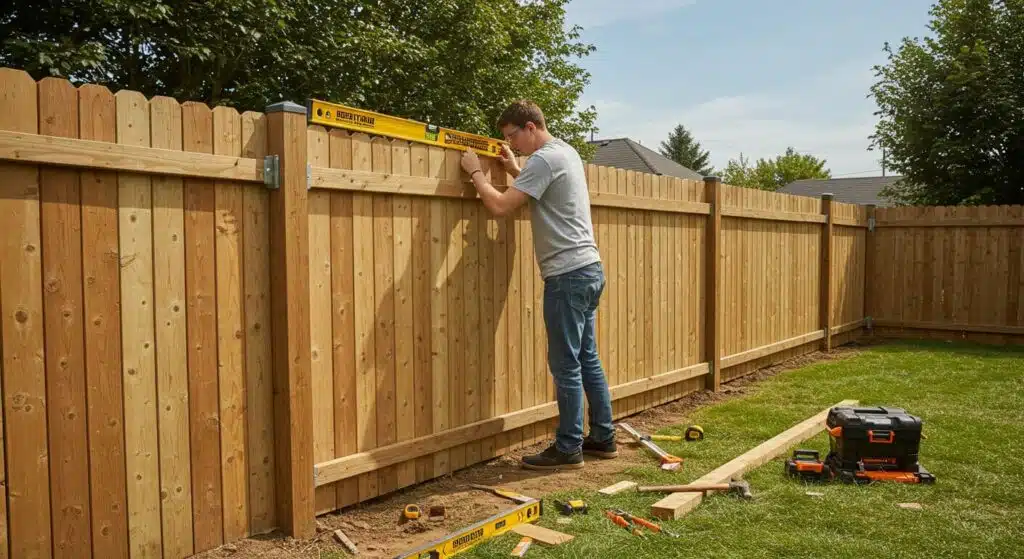
- Plumb It: The key step in the process of installing a fence post is to check that it is plumb with a post level on both sides. Make sure to brace the fence post with 2×4’s until the concrete is cured and hard enough that it doesn’t move anymore.
Step 4: Installing Rails and Pickets
Once the concrete sets up (which takes about 24 hours) you can begin wood fence installation.
- Rails: Horizontal rails made of 2x4s are vital for this type of project. Having three horizontal rails (one top, one middle, one bottom) on each 6′ section of wood fencing is the requirement for installation.
- Pickets: Vertical boards will be attached in this stage.
- Privacy: The boards must be installed together without any spaces between them to account for the shrinkage of the wood.
- Shadowbox fence: A shadow box fence installed on alternating sides gives both visual appeal and a great way to let air flow through.
- Fence height: How to make a fence taller for privacy? If six feet is insufficient, adding a lattice topper is one option.
Step 5: How to Build a Fence Gate
Construct a Gate That Won’t Sag by Adding Cross Bracing
- Cross Bracing: Make a “Z” Shape with Cross Braces on the Back of the Gate You want the diagonal bracing pointing up from the bottom hinge side of the gate toward the latch side on the top. This puts the weight back on the posts.
- Hardware: Use T-hinges that are heavy-duty and Latches for outside use.
- Post Use: All posts on each garden gate should be made from 6″x6″ lumber to prevent them from bending while they support a swinging gate.
- Securing Posts: The critical posts (corner/gate posts) should be cemented when you install them to provide extra stability to the structure of your fence. These are the two types of posts that will have the highest tension on them. Other posts may need to be secured differently depending on your location’s soil and weather conditions.
Finishing Touches
- Installing the Gate: Directly anchoring the wooden end to any of the hardware components on your fence, like latch and bolt, will prevent any damaging movement of either part.
- Use a Stain or Sealer: By using a stain or seal you will protect your fence against rot.
I still recall a project we did in Marietta where the owner attempted to dig all his post holes in two weekends by hand. The problem with the soil is that the red clay soil was too hard due to the compactness, which resulted in many holes being uneven or just too short. We were required to re-dig all his posts using an auger or a digging bar.
Important Equipment (And Where To Rent)
- Post Hole Digging Tool: This digging tool removes loose soil that has settled to the bottom of the hole. Make sure prior to digging with any of these tools (after you have checked that you have properly painted, marked the location of any buried utility lines in your area) with the Dig Safe program as to check for any underground utility lines before doing so.
- Power Auger Rental: If you aren’t in the Olympic games, don’t try to dig 20+ holes in Atlanta’s clay at manual power! You should be using a 2-person Auger or a large hydraulic powered auger you can rent.
- String Line & Batter Boards: Used for making straight lines.
- Speed Square: A tool for cutting angles. 90 degree cut
- Impact Driver: Screws hold better than nails
“Most fences have a line of fence posts spaced 10 – 12 ft apart, but base/wooden posts can be placed in the ground 2 ft down in generally stable soil.”
—Source: University of Georgia Cooperative Extension
I once recall a project in Decatur where the homeowner tried to save some money by using pine posts that were untreated, saying they’d eventually stain them to protect the wood. Sure enough, within two years, several of the posts revealed early rot at the ground line due to the perpetually moist clay soil.
Handling Slopes: Stepping vs. Racking
When it comes to some home improvement projects such as backyard fence ideas, you have two types of construction techniques:
- Stepping fence installation: The fence remains level at the top as it “steps” down the side of the hill resembling stairs. Installing a fence you step down from is one of the more common yard fence ideas providing triangular spaces between the bottom of each panel that can be utilized to place items if you have pets.
- Racking: Where you install the rails level with grade and the vertical pickets attached to them, will provide a seamless line along the bottom and How to build a garden fence on an ACLF hillside, eliminating open areas. Using the racking method creates a more secure garden fence.
Case Study: Building a Durable Wood Fence in Metro Atlanta
By Mr. Jay Fahat, Fencing Specialist at Bravo Fence Company
At Bravo Fence Company, we’ve built thousands of wood fencing booths through Metro Atlanta – from Alpharetta to Decatur. The case study below demonstrates how the proper combination of planning, soil preparation, materials used and how we install the fence will affect the longevity of the fence here in Georgia.
One such project was a 150-foot cedar privacy fence install on a sloped backyard in Roswell, where there was a thick layer of dense red clay on the ground and numerous tree roots located near the property line. The homeowner tried to dig out the post holes using a regular shovel, but was unable to due to the compacted clay and tree roots creating a varying depth of post holes that were misaligned.
The Result
The fence is still straight and secure to the eye after 6 months of weathering extensive rain, temperature fluctuations, and other elements. There is minimal movement of posts; gates open and shut with no sagging, and cedar has kept its natural appearance after 6 months. By purchasing this quality fence product from our company, the homeowners will know they have a product that can withstand Georgia’s climate, providing them with privacy and increasing the property’s value.
Other Fence Types & Ideas
How to Build a Chain Link Fence
Use the following techniques to create a cheap fencing way of keeping animals or themselves contained in places not visible from roadways. Metal terminals will be concreted into position about two feet deep (minimum), there will then be a continuous unbroken top rail that contains the fence fabric or netting stretched tightly across using a “come-along” device. Unlike wood fencing that has some flexibility with tension, metal will not give any leeway.
How To Construct A Temporary Fence
Do you need to set up a barrier around a job site or newly installed swimming pool? By using T-posts made of metal (driven into the ground with a sledge), you can create your own temporary fence out of orange safety fence or welded wire. Since no concrete footings are required, it makes removing your temporary fence very simple.
How to Build a Bamboo Fence
For a zen garden look, you can attach rolled bamboo fencing to an existing chain link or wooden frame using galvanized wire. How to build a bamboo fence is actually more about “cladding”; it’s a great way to dress up an ugly existing fence without tearing it down.
How to Build a Pet Fence
Use “coyote rollers” or angle top section inward to create pet fence on your wooden fence. Digging protection can be achieved by burying chicken wire at the base of your wooden fence.
Which is the Simplest Fence to Build Yourself?
If you wonder How to install a fence, then pre-assembled wood paneling is the fastest method. Alternatively, the least complicated (but least robust) option is a novel “no digging” into the earth, but rather pushing in a type of framework from above, complete with pointed prongs, within the ground, referred to as metal fencing systems.
Construct Your Fence Properly with Bravo Fence Company
A quality fence will provide privacy, security, and value; however, the soil (red clay), humidity, and regulations in and around the Atlanta metro area can create headaches when it comes time to install your fence if you don’t have the right installation practices. If a fence is installed incorrectly, the results will often be seen by leaning fence posts, sagging gates, and high repair costs later.
At Bravo Fence Company, we have extensive experience in the Atlanta metro market and offer professional installation practices on all of our projects to ensure your fence lasts. By working with us, you can expect quality and reliability in your fence installation.
Therefore, start working on a fence project with confidence.
Protect your property by investing in a fence today! Contact us at (770) 966-9970 to schedule a free consultation, and let our experts help you build a fence that lasts.
Frequently Asked Questions
How to build a fence for beginners?
To begin with, don’t attempt to build an entire estate on the first decision. Start with simple fence panels purchased from retailers such as Lowe’s or Home Depot so you can get used to how to set them up. You might also want to begin with fence designs such as a “dog-ear” wood fence before attempting to create more complex designs like “board-on-board”.
Do I need permission for a 6ft fence?
Unless otherwise specified by your local zoning ordinances or homeowner association rules, you will typically not require a permit for installation of a 6-foot tall fence within your backyard in Atlanta. Zoning ordinances often specify that the minimum allowed height of a fence located along the front yard is four-feet.
How much to build a fence in backyard?
For a standard suburban backyard in Atlanta, expect to spend between $18 and $30 per linear foot for DIY materials, or $35 to $60 per linear foot for professional installation of a wood privacy fence.
When building a fence who gets the good side?
When building a fence, the “good side”, the smooth side with the pickets, faces the neighbor or the street. The side with the rails and posts is on your property. This is both a matter of etiquette and, in many cases, local code.
How to build a fence with metal posts?
Metal posts (e.g., PostMaster) have strength provided by steel, but they are not visible since the wood pickets cover them. The way to install metal posts is to either drive them into the ground or concrete them in place. Then you attach wood rails to the steel flange using screws. Metal posts do not rot, and they can withstand winds greater than 70 miles per hour.