Wood Fence Paint: What Are The Best Colors And Finishes?
When it comes to enhancing the beauty and longevity of your wood fence, choosing the right paint color and finish is crucial.
The perfect combination can protect your wall from the elements and add charm and character to your outdoor space.
Let’s explore some of the best colors and finishes for wood fence paint.
Natural Tones for a Classic Look
Opting for natural tones, such as shades of brown or beige, can give your wood fence a timeless and elegant appearance.
These earthy colors blend seamlessly with the natural surroundings and create a warm and inviting atmosphere in your backyard.
Consider colors like chestnut brown, cedar, or oak for a classic look that complements various architectural styles.
Vibrant Hues for a Pop of Color
Vibrant hues can do the trick if you’re looking to make a statement and add a touch of personality to your outdoor space.
Colors like red, blue, or green can create a visually striking fence that stands out from the crowd.
However, it’s essential to choose colors that harmonize with the overall aesthetic of your property and complement the surrounding landscape.
Neutral and Gray Tones for Modern Appeal
For those who prefer a more contemporary and sophisticated look, neutral and gray tones are excellent choices.
These colors offer a sleek and modern appeal while providing a versatile backdrop for your outdoor decor.
Shades like charcoal gray, slate, or taupe can create a stylish, understated fence that complements modern architectural designs.
Matte, Satin, or Glossy Finishes
The choice of finish for your wood fence paint can significantly impact its overall appearance and durability.
Here are three standard options:
- Matte Finish: A matte finish provides a subtle, non-reflective appearance.
It can give your fence a more natural and rustic look while effectively hiding imperfections in the wood. - Satin Finish: A satin finish strikes a balance between matte and glossy.
It offers a soft sheen that enhances the color while providing moderate durability and ease of maintenance. - Glossy Finish: A shiny finish delivers a high shine and a polished appearance.
It provides excellent durability and is relatively easy to clean, making it a well-liked choice for fences that require frequent maintenance.
Remember to consider the climate in your area and the level of maintenance you’re willing to commit to when selecting the finish for your wood fence paint.
Is It Better To Paint Or Stain Your Wood Fence?
Deciding whether to paint your wood fence depends on your preferences, the desired look, and the level of protection you want for your wall.
Painting Your Wood Fence
Painting offers a wide range of color options, allowing you to match your fence to the style of your home or create a focal point in your outdoor space.
Paint forms a protective barrier on the wood, shielding it from the sun’s UV rays, moisture, and other environmental factors.
It provides excellent coverage and can help extend the lifespan of your fence.
However, the paint may require more maintenance in the long run, as it can chip or peel over time, requiring touch-ups or repainting.
Staining Your Wood Fence
Staining your wood fence enhances its natural beauty while protecting the elements.
Unlike paint, stain penetrates the wood fibers, allowing the natural grain & texture to show through.
Shame comes in shades, from transparent to solid colors, and provides excellent UV protection and moisture resistance.
Staining requires less maintenance than painting, as it tends to fade gracefully over time instead of peeling.

Ultimately, the choice between painting and staining your wood fence depends on your preferences, the desired look, and the level of maintenance you’re willing to undertake.
How To Choose The Right Paint For Your Wooden Fence?
Choosing the right paint for your wooden fence is essential to ensure its longevity and visual appeal.
Here are some factors to consider when selecting the color for your wall:
Opt for Exterior Paint
When painting a wooden fence, always choose exterior-grade paint.
Exterior paints are designed to withstand outdoor conditions, including UV rays, moisture, and temperature fluctuations.
These paints provide superior adhesion and durability, ensuring your fence remains protected for an extended period.
Consider Acrylic-Based Paints
Acrylic-based paints are famous for wood fences for their excellent durability and flexibility.
They adhere well to wood surfaces and resist cracking, peeling, and fading.
Acrylic paints also offer good coverage and are available in a wide range of colors, making it easier to achieve your desired aesthetic.
Evaluate the Sheen
The sheen of the paint affects the overall appearance of your wooden fence.
Different sheen levels, such as matte, satin, and glossy, offer varying levels of shine.
Consider the style and maintenance requirements when choosing the sheen.
For example, a matte finish provides a natural look and helps hide imperfections, while a glossy finish delivers a high-shine, polished appearance.
Test the Color
Before committing to a specific paint color, it’s advisable to test it on a small section of your fence.
This allows you to see the color against your home, landscape, and other outdoor elements.
Consider the overall aesthetic and choose a color that complements the existing features while enhancing the beauty of your outdoor space.
Considering these factors, you can select the correct paint for your wooden fence, providing aesthetic appeal and long-lasting protection.
Prepping Up Your Wood Fence For Paint Job
Proper preparation is crucial for achieving a smooth, long-lasting paint finish on your wood fence.
Follow these steps to ensure your wall is adequately prepped before painting:
Clean the Surface
Start by thoroughly cleaning the wood fence to remove dirt, dust, and debris.
Use a pressure washer or a hose with a high-pressure nozzle to wash away any grime.
Scrub the surface with mild detergent and water, and rinse thoroughly. Allow the fence to dry completely before proceeding.
Repair Any Damage
Check the fence for any signs of damage, such as loose boards, splintered wood, or protruding nails.
Replace or repair any damaged components to ensure a sturdy and uniform surface.
Sand down rough areas or snapped edges to create a smooth painting surface.
Remove Existing Paint or Stain
If your fence has old paint or a peeling or flaking stain, it’s essential to remove it before applying a new coat.
Use a scraper, sandpaper, or a chemical paint stripper to strip off the old finish.
Follow the manufacturer’s instructions for the paint removal product you choose, and ensure proper ventilation when working with chemicals.
Apply a Primer (If Necessary)
In some cases, applying a primer before painting can enhance the adhesion and durability of the paint.
If you’re transitioning from a dark to a lighter color or the wood has stains or discoloration, it’s advisable to use a primer.
Choose a high-quality exterior primer suitable for wood surfaces and follow the manufacturer’s instructions for application.
Protect Surrounding Areas
Before painting, protect nearby plants, concrete, or other surfaces from accidental overspray or paint splatters.
Cover plants with drop cloths or plastic sheets and use painter’s tape to protect adjacent surfaces.
By following these prepping steps, you’ll ensure a clean and smooth surface that promotes better paint adhesion and extends the life of your wood fence.
Step-By-Step Guide To Painting A Wood Fence
Painting a wood fence requires careful preparation and attention to detail.
Follow this step-by-step guide to achieve a professional-looking finish:
Step 1: Gather the Materials
Before starting, gather all the necessary materials, including paint, brushes or rollers, paint trays, drop cloths, painter’s tape, and any required safety equipment.
Step 2: Prepare the Fence
Clean the fence thoroughly by following the prepping steps mentioned earlier.
Repair any damage and ensure the surface is smooth and dry before proceeding.
Step 3: Apply Primer (If Required)
If you’ve chosen to use a primer, apply it according to the manufacturer’s instructions.
Allow the primer to dry completely before moving on to the next step.
Step 4: Stir the Paint
Open the paint can and use a stir stick to mix the paint thoroughly.
This ensures an even distribution of color and consistency.
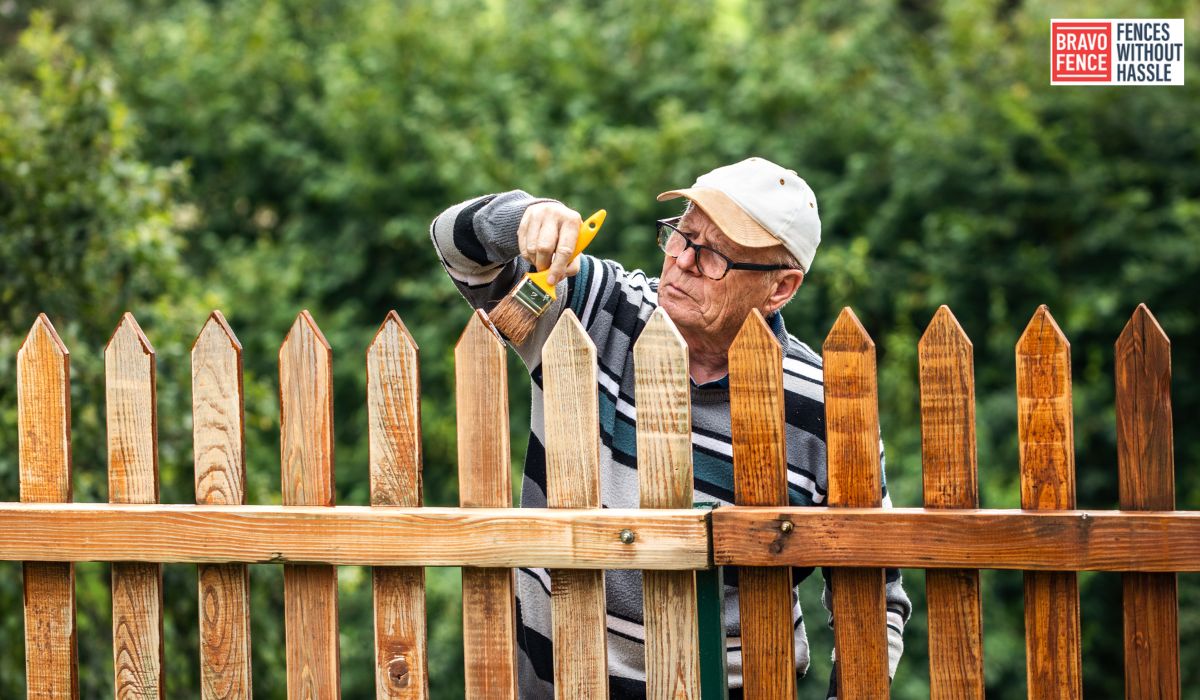
Step 5: Start Painting
Begin by coloring the edges and corners of the fence using a brush.
This allows for better precision and coverage in hard-to-reach areas.
Use long, even strokes and maintain a consistent flow of paint.
Step 6: Paint the Surface
Once you’ve finished painting the edges, use a roller or brush to apply color to the main surface of the fence.
Work in small sections, starting from the top and moving down.
Apply the paint evenly and avoid leaving visible brush marks or roller lines.
Step 7: Allow to Dry
After completing the first coat, allow the paint to dry according to the manufacturer’s instructions.
This typically takes a few hours, but it’s advisable to wait 24 hours before applying the second coat.
Step 8: Apply a Second Coat (If Required)
Inspect the fence after the first coat has dried.
Apply a second coat for better coverage and a more vibrant color if necessary.
Follow the same painting technique before and ensure proper drying time between coats.
Step 9: Clean Up
Once you’ve finished painting, clean your brushes, rollers, and any other equipment according to the manufacturer’s instructions.
Properly dispose of any leftover paint or materials.
By following these steps, you can confidently paint your wood fence, achieving a professional finish that enhances the overall appearance of your outdoor space.
Maintain And Refresh Your Backyard By Painting The Fence
Painting your fence not only improves its appearance but also plays an essential role in maintaining the beauty of your backyard.
Over time, exposure to the component can cause the paint to fade or wear off.
Follow these tips to keep and refresh your painted wood fence:
Inspect Regularly
Regularly check your fence for any signs of peeling, cracking, or fading paint.
This allows you to identify areas that require touch-ups or repainting.
Promptly addressing paint issues can prevent further damage and protect the wood from exposure.
Clean As Needed
Clean your fence periodically to remove dirt, dust, and other debris.
Use a gentle detergent solution and a soft brush or sponge to scrub the surface.
Rinse thoroughly with water & allow it to dry before considering any touch-ups or repainting.
Touch-Ups
Consider performing touch-ups if you notice any small areas where the paint has chipped or faded.
Use the same paint color and follow the original painting technique to ensure a seamless blend with the existing coat.
Touching up minor imperfections can help maintain the overall appearance of your fence.
Repainting
Over time, your fence may require repainting to refresh its appearance and provide optimal protection.
The frequency of repainting depends on various factors, including the paint quality, the climate in your area, and the level of maintenance.
Monitor the condition of your fence and consider repainting when the paint shows significant signs of wear.
Proper Maintenance
In addition to painting, proper maintenance of your wood fence is essential.
Regularly clean the wall, remove vegetation or debris that may accumulate near or against it, and address any structural issues promptly.
Proper preservation can prolong the lifespan of your fence and reduce the need for frequent repainting.
By incorporating these maintenance practices into your routine, you can keep your painted wood fence looking fresh and vibrant, ensuring a beautiful backyard for years.
Conclusion
Painting a wood fence is not only a practical step in protecting it from the elements but also an opportunity to enhance the aesthetic appeal of your outdoor space.
You can achieve stunning and long-lasting results by choosing the right colors and finishes, properly preparing the surface, and following a step-by-step painting process.
Remember to maintain your fence and promptly address any issues to ensure longevity.
With a well-painted and well-maintained wood fence, you can enjoy a beautiful, inviting backyard that adds value to your home.
What is the best paint for a wood fence?
The best paint for a wood fence is a high-quality exterior paint specifically designed for outdoor use. Look for durable, weather-resistant, and UV-protection paint products. Acrylic-based colors are commonly recommended for wood fences due to their excellent adhesion and long-lasting finish.
Should I paint or stain a wood fence?
Deciding to paint or stain a wood fence depends on personal preference and the desired look. Paint provides a more opaque and colorful finish, while stain enhances the natural beauty of the wood grain. Both options offer protection against the elements. Consider factors such as maintenance requirements & the overall style you want to achieve when deciding between paint and stain.
Should I primer a wood fence before painting?

Priming a wood fence before painting is not always necessary, but it can provide additional adhesion and improve paint coverage. If the wood is bare or has an uneven surface, applying a primer can help create a smooth and uniform base for the paint. Primers can also enhance the paint job’s longevity by preventing moisture penetration.
How do you prepare a wooden fence for painting?
To prepare a wooden fence for painting:
- Start by cleaning it thoroughly.
- Remove dirt, debris, or loose paint using a stiff brush or pressure washer.
- Repair any damaged areas and sand the surface to create a smooth and even texture.
- Make sure the fence is dry before applying the paint.
Should I paint a wooden fence with a roller or brush?
Both rollers and brushes can be used to paint a wooden fence. Meetings are ideal for painting intricate areas, corners, and edges, allowing for greater control and precision. Rollers are more efficient for covering larger surfaces quickly. A combination of both is recommended, starting with a brush for detailed work and then using a roller for the main character.
Should you pressure wash a wood fence before painting?
Pressure washing a wood fence before painting can be beneficial to remove dirt, grime, and old paint. However, using the pressure washer carefully is essential to avoid damaging the wood. Adjust the pressure to a lower setting and keep a reasonable distance from the fence. Allow the wood to dry completely before proceeding with the painting process.
How many gallons of paint do I need to paint my fence?
The number of gallons of paint needed to paint a fence depends on the size of the wall and the desired number of coats. As a general guideline, one gallon of paint typically covers around 350-400 square feet with a single hide. Measure the length & height of your fence to calculate the total square footage and determine the amount of paint needed. It’s always advisable to buy slightly more paint than you’ll need to account for touch-ups and additional coats.
Do you need special paint for the fences?
While there are paints specifically marketed as fence paints, you can use something other than a specialized product. High-quality exterior colors suitable for wood surfaces work well for painting fences. Look for stains with good durability, weather resistance, and UV protection. Consider the specific conditions your wall will be exposed to, such as sun, rain, and temperature variations, and choose a paint that can withstand these elements.
What temperature should you paint a fence?
The ideal temperature for painting a fence is typically between 50°F (10°C) and 85°F (29°C). Avoid painting in extreme heat or direct sunlight, as it can cause the color to dry too quickly and result in poor adhesion. Similarly, painting in freezing temperatures or high humidity can affect the paint’s drying process. Check the paint manufacturer’s guidelines for specific temperature recommendations.
Is it better to brush or roll stains on a fence?
Brushing or rolling stains on a fence depends on personal preference and the condition of the wall. Brushes are suitable for applying colors to small areas, cracks, and crevices, allowing for better penetration. Rollers are more efficient for larger surfaces. Consider using both methods, starting with a brush for detailed work and then using a roller for larger sections.
What lasts longer on a fence stain or paint?
Staining and paint can provide long-lasting protection for a fence if properly applied and maintained. Stain penetrates the wood, offering protection against moisture and UV damage while allowing the natural wood grain to shine through. Conversely, paint forms a protective layer on the surface, offering excellent durability and color coverage. Ultimately, the longevity of a fence coating depends on various factors, including the quality of the product, surface preparation, and maintenance.
Do you need two coats of stain on a fence?
Applying two coats of stain to a fence is recommended for better color saturation and increased durability. The first coat helps seal the wood & provides a base for the second coat. Two coats ensure better protection against the elements and can prolong the lifespan of the stain. Follow the manufacturer’s instructions regarding drying time between coats.
When should you not stain a fence?
Avoid staining a fence when the wood is wet. Moisture can interfere with the stain’s ability to penetrate the wood effectively, leading to poor adhesion and premature failure. Additionally, avoid staining a fence in direct sunlight or extreme heat, as it can cause the stain to dry too quickly and result in an uneven finish. Choose a dry and mild day for the best staining results.
What time of year can you stain a fence?
The best time of year to stain a fence is during the spring or fall when the weather is mild, & the humidity is lower. Avoid staining during high humidity, heavy rain, or extreme temperature fluctuations. Ideally, choose a time when the forecast predicts several consecutive dry days to allow the stain to dry and cure properly.
What happens if I don’t stain my fence?
If you don’t stain your fence, it will be more susceptible to weathering and damage. Unprotected wood is vulnerable to moisture absorption, leading to rot, warping, and splitting. Sunlight, specifically its V rays, can contribute to wood’s fading, graying, and gradual deterioration as time goes by. Staining provides a protective barrier that helps prevent these issues and extends the lifespan of your fence.
Should I paint my fence with a roller or sprayer?
Painting a fence with a roller or sprayer depends on personal preference and the condition of the wall. Rollers are efficient for covering large areas quickly, while sprayers can provide a smooth and even finish. However, sprayers require more preparation and cleanup, and overspray can be an issue. Consider the size of your fence, your experience with painting tools, and the level of control you desire when choosing between a roller and a sprayer.
How many coats of paint does a fence need?
The number of coats of paint needed for a fence depends on the desired color coverage and the condition of the wood. Usually, one or two coats of paint are sufficient to achieve a solid and uniform finish. However, additional skin may be necessary if the wood is porous or if you’re transitioning to a significantly different color. Follow the paint manufacturer’s instructions regarding recommended coats and drying time between coats.
Should you paint both sides of a fence?
Painting both sides of a fence is unnecessary but can provide additional protection and a more finished look. While the exterior-facing side of the wall is the most exposed to the elements, painting the interior side can help maintain consistent moisture levels and provide a cohesive appearance. Consider your priorities, budget, and the visibility of the fence’s interior when deciding whether to paint both sides.
How do you clean a fence before painting?
To clean a fence before painting:
- Remove loose dirt, debris, or old paint using a stiff brush or pressure washer.
- Using a pressure washer, use a low-pressure setting to avoid damaging the wood.
- Scrub stubborn stains with a mild detergent and rinse thoroughly.
- Allow the fence to dry completely before proceeding with the painting process.
Can you water down fence paint to use in a sprayer?
Watering down fence paint to use in a sprayer is not recommended. Fence paint is typically formulated to achieve the proper brush or roller application viscosity. Diluting the paint with water can affect its consistency, coverage, and adhesion properties, resulting in an uneven and less durable finish. Using paint products designed explicitly for sprayer application is best, or consult the paint manufacturer for suitable thinning options.
What is the best way to paint a fence?
The best way to color a fence is to prepare the surface properly. Clean the wall, repair any damage, and sand the wood to create a smooth & even texture. Protect nearby surfaces and plants with drop cloths or plastic sheeting. Begin by painting any detailed areas with a brush, then use a roller or sprayer for the main sections. Apply thin and even coats, allowing sufficient drying time between coats. Follow the manufacturer’s instructions for specific application techniques and drying times.
What is the fastest way to paint a wood fence?
The fastest way to paint a wood fence is by using a paint sprayer. Sprayers allow for quick and efficient coverage of large areas, reducing painting time compared to brushes or rollers. However, sprayers require more preparation, including masking off nearby surfaces and plants, and can result in overspray. Ensure proper ventilation and wear appropriate protective gear when using a sprayer. Follow the manufacturer’s instructions for setup, application, and cleanup.
What is the quickest way to paint a fence?
The quickest way to paint a fence is by combining spraying and back-brushing. Start by spraying the paint onto the wall to cover large areas quickly. Then, immediately use a brush to back-brush the color into the wood, ensuring even coverage and penetration. This technique allows for efficient application while ensuring that the paint reaches all surfaces and provides proper adhesion.
Is flat or satin paint better for a fence?
Flat and satin paint for a fence depends on personal preference and the desired look. Flat paint has a non-reflective matte finish, which can help mask imperfections on the surface. Satin paint has a slight sheen, providing a more durable and washable cover. Consider factors such as the style of your property, desired maintenance level, and the overall aesthetic you want to achieve when choosing between flat and satin paint for your fence.
Tags: Complete Guide to Best Way To Paint A Wood Fence, Complete Guide to How To Paint Wood Fence, Complete Guide to Paint Wood Fence, Complete Guide to Painted Wood Fence, Complete Guide to Painting Wood Fence, Everything You Need to Know About How To Paint A Wood Fence, Everything You Need to Know About Paint For Fence Wood, Everything You Need to Know About Paint For Wood Fence, Everything You Need to Know About Painted Wood Privacy Fence, Everything You Need to Know About Painting A Wood Fence, Explore Helpful Resources on Best Way To Paint Wood Fence, Explore Helpful Resources on Can You Paint A Wood Fence, Inspiration and Tips on Exterior Wood Fence Paint, Inspiration and Tips on Outdoor Paint For Wood Fence, Top Ideas and Insights About How To Paint Fence Wood, Top Ideas and Insights About Wood Fence Painting